blog
How to Read Crochet Patterns Like a Pro
Crochet can be a fun and relaxing craft, but for many beginners, the process of reading crochet patterns can feel overwhelming. With a combination of abbreviations, stitch counts, and symbols, crochet patterns might appear complicated at first glance. However, learning how to read crochet patterns is an essential skill that will open the door to creating a wide variety of projects, from simple scarves to intricate blankets and garments.
In this comprehensive guide, we will break down how to read crochet patterns like a pro. We will cover the basics, from understanding crochet terminology to decoding pattern instructions and symbols, so that you can confidently tackle any crochet project. By the end of this article, you’ll be equipped with the knowledge and skills needed to understand crochet patterns and bring your creative visions to life.
1. Understanding Crochet Terminology
The first step to reading crochet patterns like a pro is understanding the terminology used in crochet instructions. Crochet patterns often use abbreviations and specialized terms that are consistent across most patterns, making it easier to follow instructions once you become familiar with them.
Common Crochet Abbreviations
Crochet patterns use abbreviations to save space and simplify the instructions. Here are some of the most common abbreviations you will encounter:
- ch: Chain
- sc: Single Crochet
- dc: Double Crochet
- hdc: Half Double Crochet
- tr: Treble Crochet
- sl st: Slip Stitch
- st(s): Stitch(es)
- rep: Repeat
- rnd: Round
- inc: Increase
- dec: Decrease
Each pattern will begin with a list of abbreviations, so be sure to check this section to familiarize yourself with the shorthand used in the instructions.
Understanding Crochet Terms
In addition to abbreviations, crochet patterns may also use terms that describe specific techniques or the structure of the stitches. For example, the term “join” may refer to connecting two pieces of crochet together, while “turn” indicates that you will rotate your project and work back in the opposite direction.
“Working in the round” refers to a technique where you crochet in a continuous spiral, rather than turning at the end of each row. “Joining” means connecting two or more pieces of crochet work together.
Understanding these terms and how they relate to your project is crucial for reading crochet patterns accurately.

2. Reading the Pattern Instructions
Once you’re familiar with crochet terminology, it’s time to dive into the pattern instructions themselves. Crochet patterns are typically broken down into rows or rounds, and each section will tell you exactly what to do.
The Basic Structure of a Crochet Pattern
A typical crochet pattern consists of several key sections:
- Yarn and Hook Information: This section will tell you which yarn weight and hook size to use for the project. It’s important to follow this to ensure that your finished item has the correct size and texture.
- Stitch Abbreviations: As we discussed earlier, the pattern will list common abbreviations and their meanings.
- Instructions: This section is where the actual crochet steps are written. These instructions can vary depending on the complexity of the project, but they typically describe the stitch sequence for each row or round.
Understanding the Stitch Sequence
Each line of the pattern represents a row or round, and it tells you which stitch to make and how many times to repeat it. For example, a typical line in a pattern might look like this:
Row 1: ch 2, 6 sc in 2nd ch from hook (6).
This means you should chain 2 stitches, then make 6 single crochets in the second chain from your hook. The number in parentheses (6) indicates how many stitches you should have at the end of the row. This number helps you track your progress and ensures your work is the correct size.
In more complex patterns, the instructions may include more detailed stitch sequences, such as alternating between different types of stitches (e.g., single crochet and double crochet), or instructions for shaping your piece (increasing or decreasing the stitch count).
3. Decoding Crochet Charts and Diagrams
While many patterns are written in text, some patterns use crochet charts or diagrams to visually represent the stitches. Crochet charts can be particularly useful for visual learners, as they allow you to see the pattern and follow along more easily.
How to Read Crochet Charts
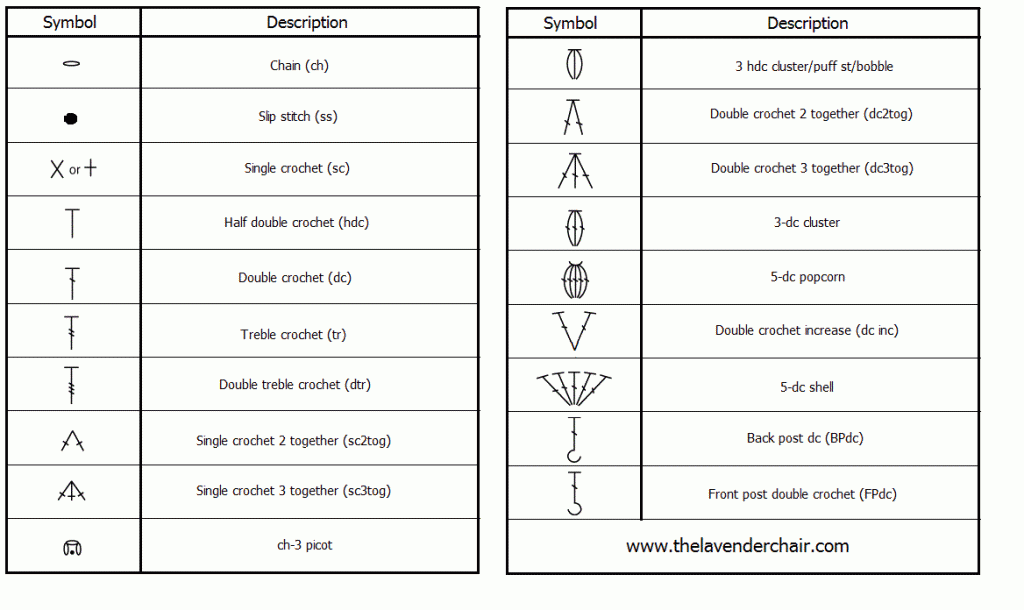
Crochet charts use symbols to represent different stitches. These symbols are standardized across most patterns, so once you learn them, you can use them to read charts for any project. Here are some common crochet chart symbols:
- O: Chain stitch
- V: Slip stitch
- +: Single crochet
- T: Double crochet
- X: Half-double crochet
Charts are usually read from right to left, starting at the bottom row and working upwards. Each row represents a line of stitches, and the chart will show the sequence of stitches needed to complete the row.
In some cases, crochet charts may include multiple colors or different stitch patterns within the same chart. These charts are often accompanied by a key or legend that explains what each symbol or color represents.
Using Diagrams to Visualize Your Project
In addition to charts, some patterns include diagrams that show the overall shape and layout of your project. These diagrams can be particularly helpful when you need to understand the shape of a garment or other large item. The diagram will often include measurements and stitch counts, helping you gauge the size and shape of your work as you go.

4. Following Complex Instructions
Once you’re comfortable with basic patterns and stitch sequences, you may encounter more complex crochet patterns. These patterns often include advanced techniques, such as shaping, lacework, or textured stitches. Understanding how to follow these patterns requires a bit more attention to detail, but with practice, you’ll be able to tackle even the most intricate designs.
Understanding Increases and Decreases
One of the most common techniques in complex patterns is increasing or decreasing your stitch count. Increases are used to make your project wider or to create shaping, while decreases are used to make your project smaller or to shape areas like armholes or necklines.
For example, an instruction might read:
Row 2: sc in first st, 2 sc in next st, sc in next 4 sts (6).
This means you make a single crochet in the first stitch, increase by making 2 single crochets in the next stitch, then make 1 single crochet in the next 4 stitches.
When decreasing, the pattern may instruct you to work two stitches together. For example:
Row 3: sc2tog, sc in next 3 sts (5).
Here, sc2tog means to single crochet two stitches together, which reduces the stitch count by one. Decreases are often used to shape projects like hats or amigurumi.
Learning Specialized Stitches
More advanced patterns may also include specialized stitches such as puff stitches, bobble stitches, or shell stitches. These stitches may look unfamiliar at first, but once you learn them, they’ll become a regular part of your crochet toolkit. Be sure to check any pattern notes or instructions for how to make these stitches, and practice them before starting your project.
5. Troubleshooting and Checking Your Work
Even with the best of intentions, mistakes can happen while crocheting. Whether you’ve lost your place in the pattern or missed a stitch, it’s important to troubleshoot and check your work as you go. Here are some tips for catching mistakes early:
- Count your stitches: After each row or round, count your stitches to make sure they match the stitch count in the pattern. If the stitch count is off, it’s easier to fix the mistake right away.
- Use stitch markers: If you’re working in the round, stitch markers can help you keep track of the beginning and end of each round. This will prevent you from getting lost and help you maintain the correct stitch count.
- Review the pattern: If you’re having trouble, reread the pattern carefully. Sometimes small mistakes can be corrected by simply reviewing the instructions step by step.
Conclusion
Reading crochet patterns doesn’t have to be a daunting task. By familiarizing yourself with crochet terminology, stitch sequences, charts, and diagrams, you can unlock the full potential of crochet and create beautiful, intricate projects with ease. The key to becoming a pro at reading crochet patterns is practice and patience. Start with simple patterns, and as you gain confidence, move on to more complex designs. With the tips and techniques outlined in this guide, you’ll soon be able to read crochet patterns like a pro and bring your creative ideas to life with every stitch.


